Showing posts with label Home Improvements. Show all posts

Monday, July 29, 2013

Renovation Update: Bay Restoration Fund Act

Baby steps people.  We are finally getting started on our journey towards our home renovation!


We received word that we were approved by the St. Mary's County Health Department for the Bay Restoration Funding Grant. There are still a couple of documents that need to be sent in for review, such as tax return info from last year, but this is still a great first stepping stone! Once everything is in order, we will be able to get started on installing a new septic and mound system.

Based on our income from 2012, they will determine how much of the Grant funding we are eligible to receive. If collectively we've made less than $300,000 in 2012 alone, we are eligible for 100% of the Grant funding. Let's just say, we are certainly going to receive the full 100% of the Grant.

From there, we get to choose from a list of five Advanced Treatment Unit (ATU) Vendors to determine what the best style of tank is for our home. Then we can finally call our excavator [which is still yet to be decided] and get to work. I don't want to jinx myself, but I may be seeing light at the end of the tunnel, even if it's just a glimmer!


Thursday, June 27, 2013

Birthday Bliss

Today is one of my favorite days of the year, my birthday!! I've been pampering myself and relaxing, but I did want to share a couple pictures I've taken in the past couple of days, just because they're pretty. Enjoy!


While trimming back my rose bushes a couple days ago, I found a beautiful little birds nest with these three eggs.

My sweet beagle, Harper, about a year and four months old, helping with yard work.

The lavender bush was in full bloom and filled with bumblebees.

Another view of the lavender bush.

Starting to get the porch ready for the 4th of July!

Thursday, June 20, 2013

Keep the Curb Appeal Coming...

Renovation Status Update: We are making extremely slow progress with the County and the bank(s). {at least it's something though...} In July we will be applying for a grant that St. Mary's County is offering to residents in critical areas {check} for a new innovative sand septic system. After speaking with a couple Health Department officials, this seems to be the route we need to take.

We've also researched all of our options for financing this project. Now we have to decide who we are going to go with {offering the best rates}, and how soon we can get started.

Next on my check list is to call Dave Decker Plans LLC and schedule an appointment for him to come out to the cottage and draw up our addition {or second story} plans.

------------

Ok, so in the mean time, we're working on boosting our curb appeal. Bubba took the initiative to freshen up our fence in the front yard with a fresh coat of white paint {pictures to come soon}, and it looks GREAT! That was one job I was MORE than willing to hand over to him. I'm all about painting inside the house, but a white picket fence? I'll leave that to Tom Sawyer and Huck Finn, or in this case, Bubba Hill!

More up my alley was the flower basket I added to the gate of the fence. I found this cute little metal basket with a flat back and knew it would be perfect for the fence. It just needed a little bit of spray paint and a couple of screws. 


Oh, and of course some flowers too! I grabbed a couple buy one-get one portulaca's from a local flower and vegetable vendor, Betty Russell in Clements, and the project was complete. It turned out so cute, now if only I could get the flowers to bloom out a little more...


I threw a couple of the extra portulaca's in a pot and placed them on stump by our "driveway". 

Wednesday, June 5, 2013

Cottage Improvement Chronicles: Flower Garden UPDATE

A little less than a month ago, I shared the story of our "Dead Shed" with you, as well as our plans for the revitalization of the spot where it lived. To make a long story short, we have an UGLY spot in our backyard that needs to be made pretty. Easy enough, right? Right...

So, we've cleared the spot, tilled it up, bordered it with old bricks and drift wood, planted wild flower seed, and are waiting not-so-patiently for the first signs of "bloomage". In the meantime, I decided that it needed just a little something else to make it a true oasis for the wildlife in our backyard. A bird bath! Yep, that's what it needed, it would add height to the space and give all the wandering birds a place to cool down.

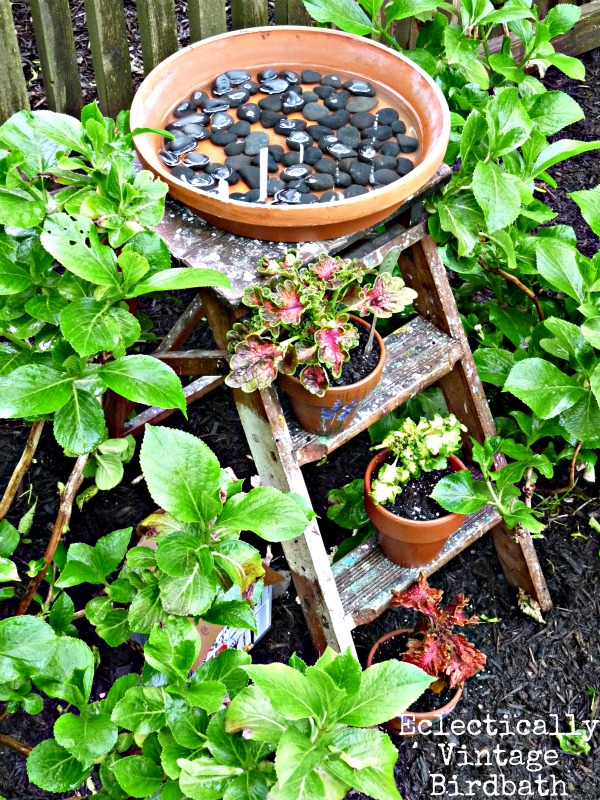
After a little browsing, I realized that a decent bird bath is not cheap. And then it hit me, why would I buy a new bird bath, when everything else in the garden was a DIY project constructed out of things and materials that we already had? I decided I'd make my own bird bath...While perusing Pinterest one day, I stumbled across the cutest idea for a home made bird bath from Eclectically Vintage...


I mean, seriously, how adorable is this set up?! It got my juices flowing, and I rummaged through our cluttered garage in search of an old step ladder, the bottom pieces of a couple flower pots, and some smooth stones.

Stones? Check...we use to collect sea glass and unique rocks from the beach in a basket on the front porch, and I had a baggie of store-bought stone left-over from my boot rack project a couple months ago.

Flower Pot Holders (I'm sure there is a real name for these things, and I just don't know it...)? Check! I couldn't believe my luck, something told me to peak under the back deck and there sat two perfectly sized plates from pots in a pretty sea-foam green and your typical stone color. Thank you, former landlord...

Old Step Ladder? Negative. But I did find an old work bench, a weather worn stump, a big plastic barrel that I bought last year from Lowes that was filled with flowers, and a vintage plant stand left by the landlord that I had spray painted and kept on the porch. Not as rustic or cute as the step ladder, but hey, it all worked for me!

After some serious placement and replacement of all the pieces, I finally found a set-up that I was satisfied with. I even found a cute little bird decor piece from a yard sale to complete the DIY project. It's certainly not as cute as the pictures and inspiration I found on Pinterest, but I'm REALLY hoping that once the wild flowers come up it will look nice and give the birds a save haven.


Wednesday, May 29, 2013

Curb Appeal Pt.II

I just wanted to share a few more pictures of the cottage's curb appeal this year. The weather has finally started to warm up, and everything is in full bloom!


I'm always sharing pictures from the front of the house, so I thought I'd switch it up a bit.

Sunday, May 19, 2013

Cottage Improvement Chronicles: Curb Appeal

We've really thrown ourselves into improving our yard while we're on hold with the rest of the house. (With broken blinds and a dilapidated septic system, I'm getting PRETTY antsy waiting for to get started on the house) So, I'm determined to get the rest of our lot looking tip top! Here is a quick glance at some of the pretty new curb appeal at Point Breeze Cottage:


Our neighbor gave us her old walkway pavers when Bubba laid her new ones down for her. So, we upcycled them, and placed them around the two old/wild bushes in the front yard. Add a little mulch and a drift wood looking stump found on the beach, and voila! 


Bubba mulched the side of the house/flower bed that we had professionally done last year. Everything looks so clean and is blooming out beautifully!


Our gorgeous, old rose bush in the front of the garage is blooming out and climbing the lattice!


The lovely bouquet of roses and peonies from around the yard.

Thursday, May 16, 2013

Cottage Improvement Chronicles: Dead Shed

I am abnormally excited to tell you all about the latest improvement we are making to the Point Breeze Cottage. Honestly, it's not really an improvement to the cottage itself, but more-so one to our yard.

The status on the cottage: Stuck in a holding pattern. We have discovered some septic issues and are trying to sort them out with the Health Department before we can move on with any additions or upgrades to the house. You'll read more about this dilemma later...So for now, we're focusing on our yard.

Anyway, on our property we have a large garage that allows us to store all kinds of junk, tools, projects, etc. A very useful structure indeed:

Sturdy, large, and not completely hideous. This is an old picture, we've since added a piece of lattice above the rose bush to the left to allow it to climb the wall and add some color. We've also relocated the large bushes (right) to the back yard. PS- check out the sweet deer sign my dad welded for us all on his own!

So that's the garage. What you can't see in this picture? The eye-sore that had been the thorn in every neighbors side LONG before we purchased the house...what I like to call, the "Dead Shed".


This picture doesn't actually do justice to the hideousness that was the "Dead Shed".  We took this picture after Hurricane Irene came through and knocked the tree over onto the shed. (You can learn more about our battle with Hurricane Irene by clicking HERE or HERE on my old blog) As you can see, this was all hidden behind our garage, shielding it front the front street, but leaving it exposed to all of those behind us. 

This mess had been this bad for years, so we took the storm as a sign/opportunity to relieve our neighbors of the ugliest spot on the block. Once we got rid of the old shed and remnants of the shed, we found a trove of junk. So much junk. Nails, screws, light switches, bottles, ice skates, cans, a toilet, random pieces of metal, fishing poles, and lots and lots of old plastic jugs. Being the daughter of a waterman, I know that most of the jugs were probably used years ago for marking pots in the water, but you'd think they'd have gotten thrown away. Nope everything was just left here; A catchall for things that were no longer wanted or used.

We removed as much as we could and did our best to rake up the dirt underneath. Bubba used the space to plant a small vegetable garden last year, with great results. This year he and his dad are planting a larger amount of fruits and vegetables on their family farm in Mechanicsville, so the space was free again. And looked rough...


No structure, no clean lines, just a mess...my OCD couldn't take it much longer...

We tilled and raked, removed the pavers we'd placed in the center for the firepit, and gathered up all of the old bricks that were leftover from the fireplace we found in our bedroom wall. (Read more about that escapade HERE!)

View from the backstreet/what our neighbors see when they look out their front door. (A wild puppy, a hardworking husband, a crazy lady with a camera, and the beautiful Potomac River)


We cleared what we could, placed the bricks around the perimeter (after fighting with several NASTY spiders), threw down some Preen for good measure, gave it a good soaking, and then spread some wildflower seeds. We figure that once our septic issues are resolved, we're more than likely going to need a mound system. So why waste the time, effort and money of creating a garden oasis, when we'll probably have to remove it at some point? Not to mention, we aren't exactly diligent when it comes to pulling weeds...to me, this seemed like the best option, and certainly the prettiest one. 

Here are a couple of shots once we finished. Now we water and wait for the flowers to grow!

We decided to add a nautical touch by using some old drift wood we've collected over the years from the beach around the perimeter of the garden. As you can see, there are still some weeds in the tilled up dirt, but that's the beauty of wildflowers, it doesn't matter! 


Certainly not perfect, but we're making progress!

I can't wait for the flowers to start growing so they can add a pop of color to the backyard. In the mean time I'm working on a DIY birdbath project for the center of the flower garden, using all up-cycled materials from around the house...Look for a post on that project in the near future :)

Thursday, April 11, 2013

Cottage Improvement Chronicles: The Plans

As much as I love our little cottage, I've know from day one that it's interior layout wasn't exactly my style. A four room house with one tiny bathroom is hardly conducive for two people and a beagle with ADD, let alone a couple thinking about children in the future. So, I started thinking about what I wanted to do to the house to "make it ours" and really make it our dream home. I could picture every detail...a giant mudroom on the back that swings around to a sun-room on the side of the house. A second story with a master bedroom and bathroom (complete with large walk in closest, claw foot tub, and balcony that over looks the Potomac River), as well as Jack and Jill style bedrooms downstairs, and don't forget the office/library...

And then we talked to Bubba's uncle, who just so happens to be a licensed contractor, who kindly reminded us that the front of our house is built on piers. Very old piers that can only hold so much weight, which is most likely the reason we only have a loft right now, and not a second story. Of course, we could jack the house up, remove the piers and put in a foundation, but money isn't growing on trees down here in Colton's Point. After that mild reality check, I decided to scale my plans back just a bit.

Here is a rough sketch I did of how I believe we could lay out our house while keeping the piers in the front. We are lucky in the fact that the kitchen/back of the house has an actual foundation and we could build a second story over top of it. PLEASE bare with me...these were done in Microsoft Paint...I never claimed to be a graphic artist!


But this wouldn't be a home repair/improvement process if there were some challenges...up next - sh*t hits the fan, well, the back yard...Hello, Septic Problems!

Thursday, March 28, 2013

The Cottage Improvement Chronicles

There are big changes in the works for Point Breeze Cottage, and I don't mean our Etsy shop. The home behind the shop name is finally ready for a face-lift of sorts. After renting this sweet little cottage for two years (2009-2010), and making it our own over the past two and a half years, we're finally in the position to make some more permanent changes and upgrades.

I've received a lot of advice for enduring serious home improvements projects, including, "keep your expectations low so you aren't disappointed and KNOW that it WILL take longer than you expect." Not exactly the most optimistic words of wisdom, but at least it's honest. So, I've decided to chronicle our journey through the land of home improvements on our little blog here.

Where do we start? At the beginning of course! Here is a photo of the day we met with our former landlord to "interview" to become her tenants. [I'm not sure if 'interview' is the right word, but she wanted to make sure we were the right 'fit' for her home.]


And here is a shot of the house and yard during the two years we were renting. We tried to add our own personal touches, but it's hard when you're only renting. I believe the lights were up from a party we'd recently thrown...


I'm looking forward to sharing our story with you - the ups and the downs, the smiles and the frowns. Have a suggestion? Question? Comment? Please, please, please feel free to leave it in the comments section or shoot me an email [ptbreezecottage@gmail.com] we'd love to hear what you've got to say!

Up next: Getting the party started...and the roadblocks that slowed us down...
 
SITE DESIGN BY DESIGNER BLOGS